Software restriction policies are an important support feature of Windows Server and Microsoft Windows 7. This provides the administrators a policy-driven mechanism that can be used to support & recognize software programs which are being used on computers over a domain. In addition, Software Restriction Policies can even control the executing ability of such programs.
IT Support for Software Polices:
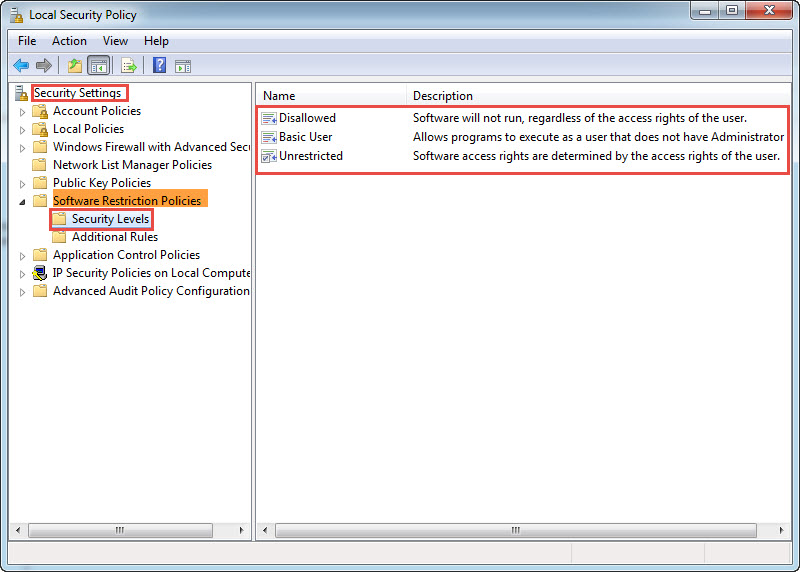
We generally apply Software Restriction Policies in three levels.
- Disallowed: By using this policy, the Software will not run regardless of the access rights of the user.
- Basic User: Allows programs to execute as a user that does not have Administrator access rights. But, the user can still access resources that are accessible to normal users.
- Unrestricted: By implementing this policy, you can provide unrestricted software access to a user.
Mentioned below are the steps on how to use Software Restriction Policies to protect your Windows 7 system against unauthorized access attempts.
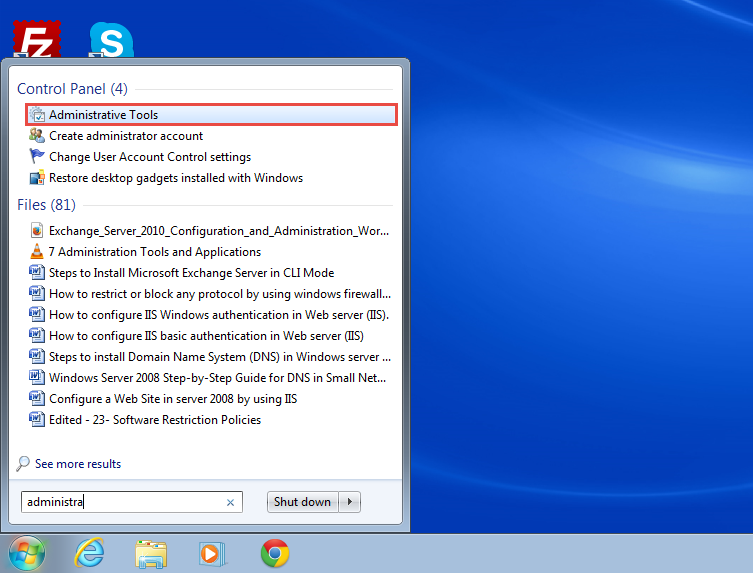
Step 1: To get started, go to the Start Menu and type in “Administrator Tool” in the “Search Programs and Files” space. (Check the Windows 7 screenshot below)
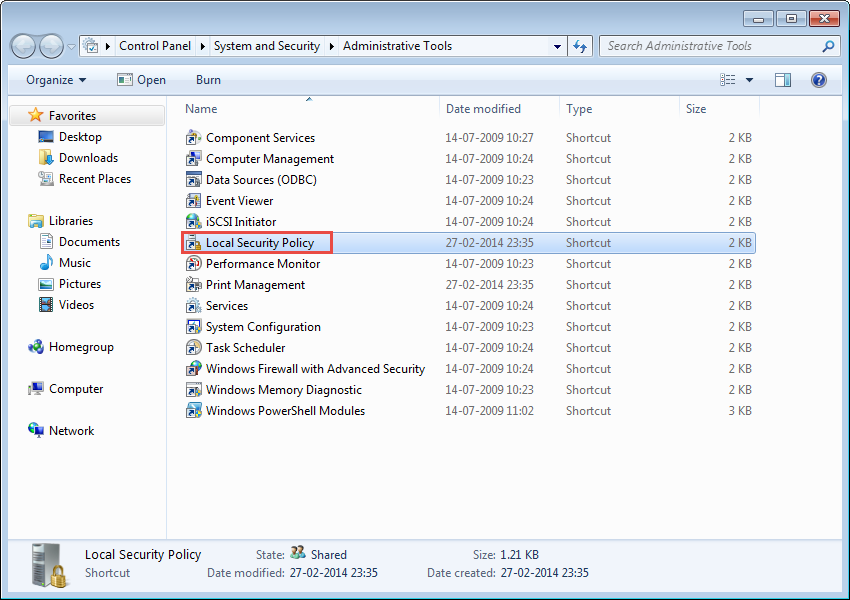
Step 2: Scroll down and click on the “Local Security Policy” option in the next window. (Check the screenshot below)
Step 3: Click on the “Software Restriction Policies” entry on the left side panel of the next window.
Step 4: Next, click on the “Security Levels” options. (Check the screenshot below of Windows 7)
How to restrict a Program by using Software restriction Policy in Windows 7
We generally need to follow the following 4 Rules while implementing Software Restriction Policy:
- New Certificate Rule: Certificate Rule will restrict program access by providing a code-signing software publisher certificate.
- New Hash Rule: This rule blocks applications by using the Hash Rule.
- New Network Zone Rule: Network zone rule can restrict or allow software from a zone that is specified through the Internet Explorer.
- New Path Rule: The path rule blocks an application by its location in the file system of the computer or on the network.
New Hash Rule
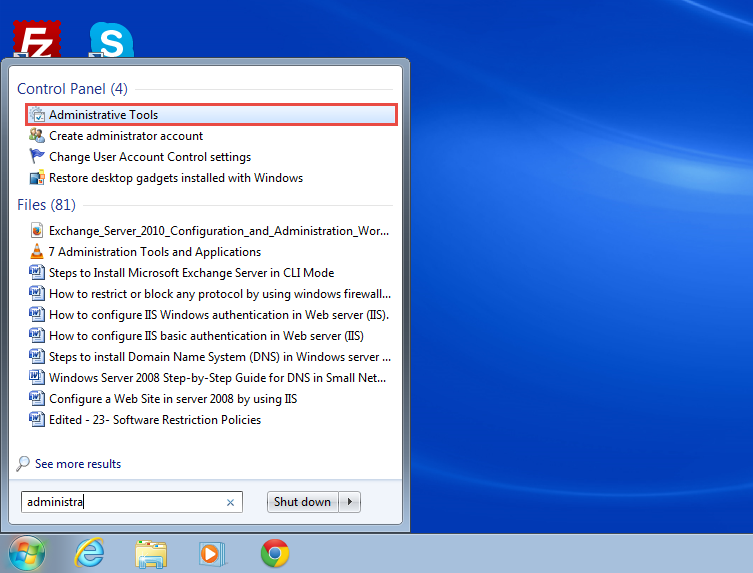
Step 1: Go to the Start Menu and type in “Administrator Tools” in the “Search Programs and Files” space. (Check the screenshot below)
 Step 2: Again, click on the “Local Security Policy” entry. (Check the screenshot below)
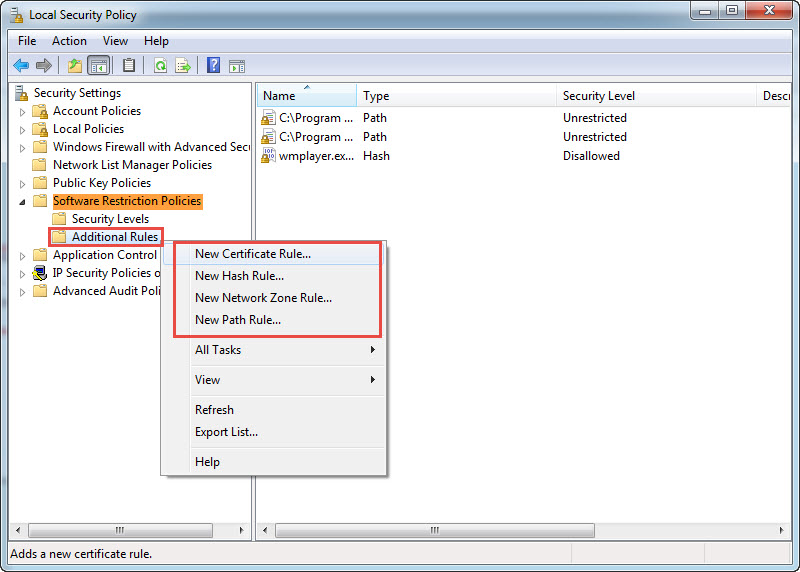
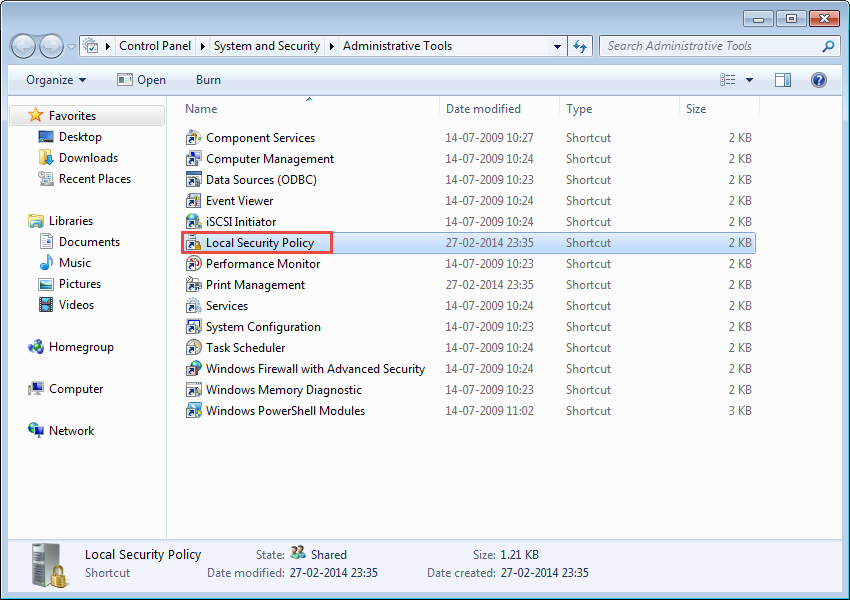 Step 3: Click on the “Software Restriction Policies” option displayed on the left side panel of the “Local Security Policy” window.
Step 4: Next, right click on the “Additional Rules” option. Amongst the four rules that appear, click on the “Hash Rule” option. (Check the screenshot below)
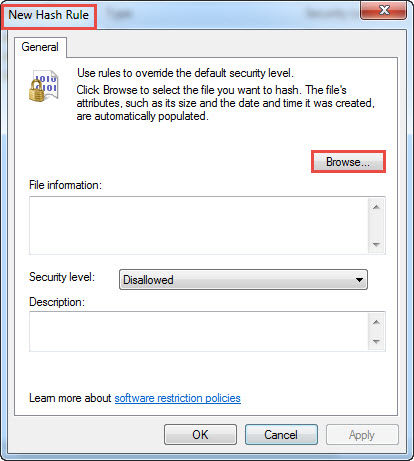
 Step 5: “New Hash Rule” dialogue box will now appear on the screen. Click on the “Browse” tab to proceed. (Check the screenshot below)
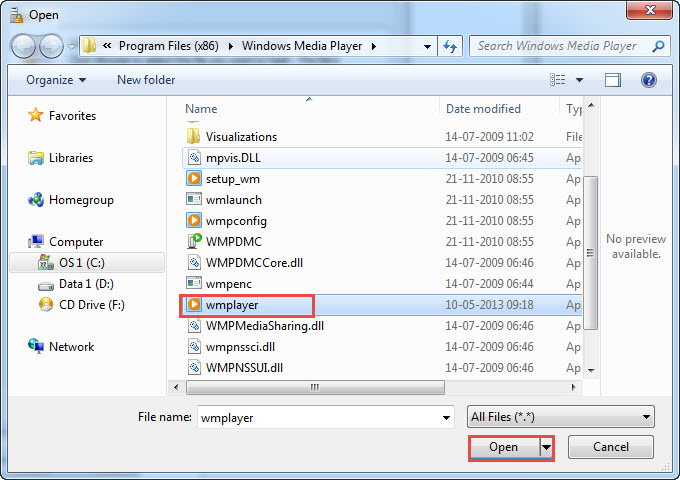
 Step 6: Under the new program window, select a program you want to block. For instance, we select a program: wmplayer.
Step 7: Click on the “Open” button to continue. (Check the screenshot below)
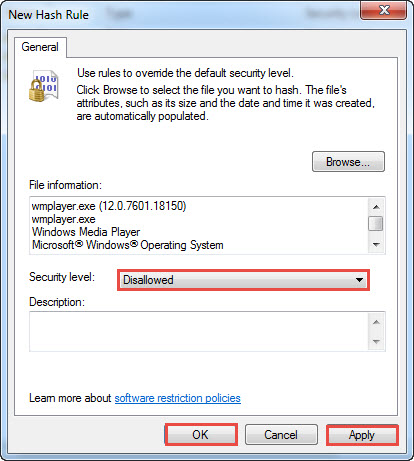
 Step 8: Again “New Hash Rule” dialogue box will appear on your screen. Select “Security Level” as “Disallowed.”
Step 9: Click on the “OK” button to apply the changes. (Check the screenshot below)
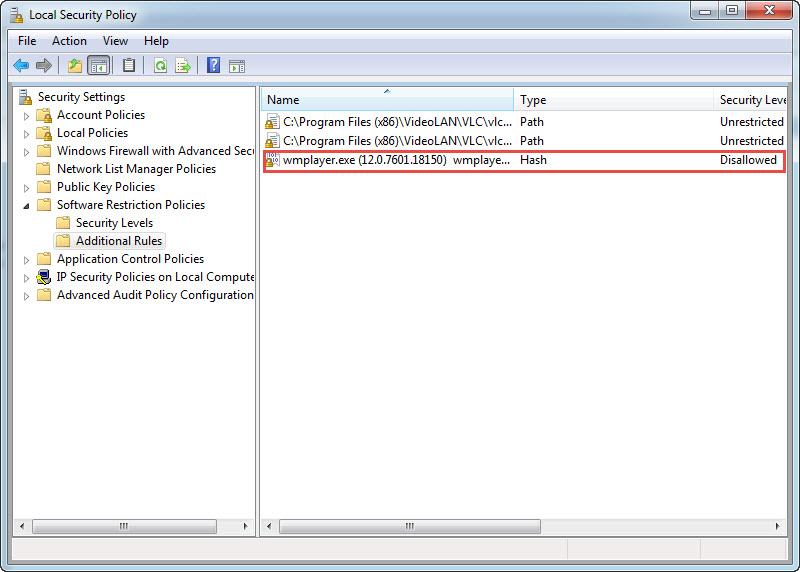
 Step 10: Here, we can see that Windows Media Player is blocked by using Hash Rule. (Check the screenshot below)
 Step 11: Next, try accessing Windows Media Player. A dialogue box will appear, displaying the message, “This program is blocked by group policy. For more information contact your system administrator.” (Check the screenshot below)
 New Network Zone Rule
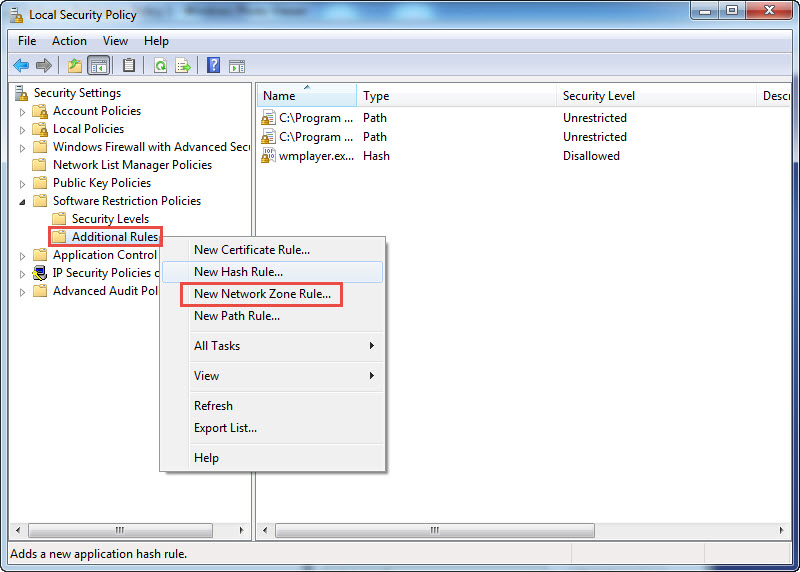
Step 1: Go back and right click on the “Additional Rules” option. Next, click on the “New Network Zone Rule” option. (Check the screenshot below)
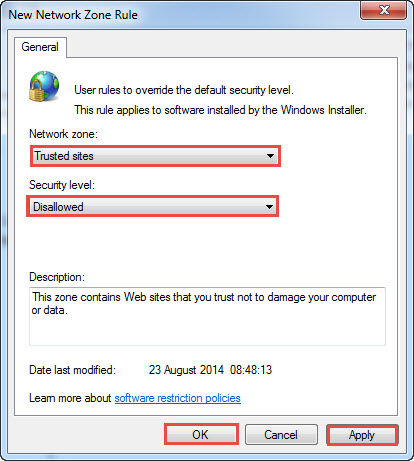
 Step 2: A “New Network Zone Rule” dialogue box will now appear on your screen. Select “Restrict Sites” in “Network Zone” and “Disallowed” in “Security Zone”.
Step 3: Click on the “OK” button to apply the changes. (Check the screenshot below)
 New Path Rule
Step 1: Right click on the “Additional Rules” option as we did earlier and this time, select the “New Path Rule” option. (Check the screenshot below)
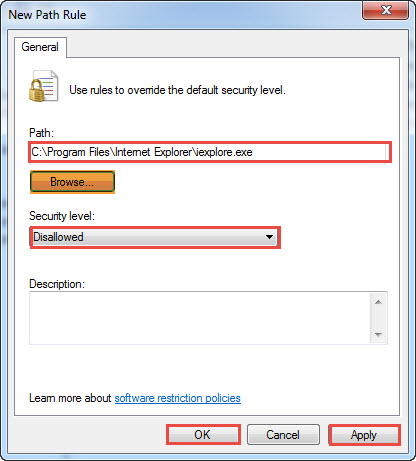
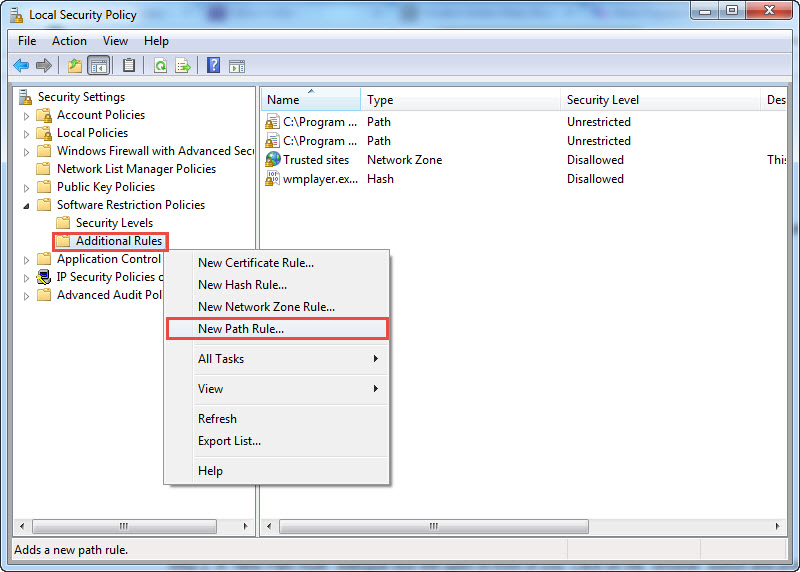 Step 2: A “New Path Rule” dialogue box will open in-front of you. Click on the “Browse” button and provide the path of the file you want to restrict. Here we’ve tried to restrict “Explore.exe.”
Step 3: Select the “Security Level” as “Disallowed” and click on the “OK” button to apply the changes. (Check the screenshot below)
 Step 4: Now try to open the “Internet Explorer.” A dialogue box will appear, displaying the message, “This program is blocked by group policy. For more information contact your system administrator.” (Check the screenshot below)
 Need Windows 7 Training?
If you were unable to implement software restriction policies on Windows 7 or other Microsoft products call us for help. We provide excellent classroom based training in Chicago area.

